How to Take Pictures of Clothes to Sell Online

If you are trying to do photography for your online clothing business it might be a challenging task for you and obviously, You may consider it tougher initially. Actually, Taking pictures of clothes to Sell Online isn’t tough at all. It is as much as other product photographs but in the case of clothing items, there are some dedicated facts you must know!
When someone lands on your product’s website what is the first thing they notice?
Photographs! Yeah, this is the first impression. So, If you want to persuade your customers to buy your clothing items, good photography can do half of the job.
According to a study, The more creatively you can represent your clothes for your audience the more you raise the chance of generating leads.
Even, with smart and attractive photography you can convert a worse photo to an awesome one.
Don’t worry at all as long as we are with you! Today, I’ll show you all the things including strategies and the proper system to help you take more than just awesome photographs of your clothing products.
From now on, people will just love your every clothing photography! (have faith in me)
8 steps: How to take pictures of clothes to sell online
When you think How to Take pictures of clothes to Sell Online it’s significant to follow the proper steps.
I have taught clothing photography to many people and I think I’m experienced enough to share the best of best and proper ways for clothing photography.
Being able to take good photos of your clothes is all about following the proper procedure and techniques.
You can’t do it yourself easily! And when it comes to capturing for your business, it sounds very special and you have to act more smartly!
Clothing photography is a little bit hard in reality but if you try with dedication and following the proper way I can ensure that you will be successful.
I’m breaking down the process into 8 steps to help you understand easily.
Step 1 – Decide on how you want to display your products
when you even think about How to Take pictures of clothes to Sell Online, the first step is making a decision on the visualization of your product photo.
First of all, you will have to decide exactly how you want to display your clothing photos on your website and you gotta make this way your website default.
It’s necessary because your customers would be able to identify your photographs from the next time.
There are three common ways merchants usually show their product photographs.
Use an invisible mannequin
Using an invisible mannequin is the first thing you should know about when you are curious to know How to Take pictures of clothes to Sell Online.

When you think about the ways to generate leads then you should focus on more realistic ways to show photo like the mannequin effect.
Online shoppers tend to be more interested in buying clothes when they can visualize how it will look when they wear.
A mannequin will give your clothes a realistic human shape without the hassle of finding models. Later, you can remove the background of the cloth (the mannequin) for a more professional look.
And remember to avoid the amputated arms because it makes a photo-less realistic and doesn’t fulfill the requirement of the mannequin.

Tips: Make sure you use a mannequin that is standing straight-on. The mannequins used for brick-and-mortar stores are best because they stand in a unique position to make sure all dolls are not the same.
Removing the mannequin from your photo is necessary because it’s the ultimate goal that creates the mannequin effect but it depends on the context. The below picture is an actual example of a Mannequin.

This is called the mannequin effect. I’ll talk about it later in this post.
Hire A Model
We have already known the method to take pictures with the mannequin. But how to take pictures of clothes without a mannequin?
Taking pictures of clothes to Sell Online isn’t much easy, but hiring a model can be an easy method for super photography (but only if you have the budget).

If you have the budget I highly recommend you to hire a model, Large companies and renowned institutions follow this method.
But you won’t have to hire popular and costly models! Anyone that suits your business clothes can be hired.
The best part about hiring models is they can occupy any pose or work with any kind of angle that represents your brand to a greater extent. This will help you create the perfect photos for your eCommerce as well as social media contents.
Tips: You should experiment with different poses to understand the best-suited way and make sure you don’t cover up too much of your photos with text.

Models also create personality and give you more of a brand. Plenty of online stores choose models who they think represent their target customer.
If you compare the below two examples, they are not different in any case. It’s all about pose and relevance.
The downside of hiring models is, it is more costly than a mannequin. And you will have to find a convenient time mutually for a photo shoot.
So, what do I recommend?
Well, my recommendation is if your business is quite new and you don’t have the budget, don’t hassle much! Just try out the mannequin and it’s initially good for your business!
When you become capable of hiring models and your business gets in a good position too then you can think of models.
Mannequin isn’t worse! You just have to be able to do photography well.
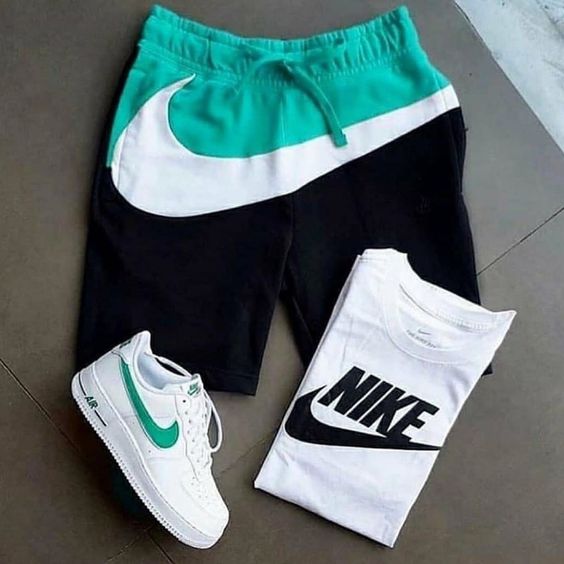
Flat lay Photography

When we worry about How to Take pictures of clothes to Sell Online, Then Flat Lay is the easiest method!
The Flat lay is the easiest and affordable way to photograph your clothing items.
Flat lay photography works best for T-shirts and casual shirts. I have seen this method works for shocks and men trousers too.
I should not normally recommend flat lay photography for your eCommerce store unless you need an awesome visual to share on social media.
In general, when it comes to product images, displaying them as realistic as possible is much more valuable to your customers.
How Flat Lay photography works
There are plenty of flat clothing photography kit available where you will find all of the pieces of stuff you need but this is extra costly that’s why I’m not recommending it.
To capture flat lay photos, at first you will need a large piece of white paper or sheet to lay on the ground. Actually, you can choose anything for the background but that must suit your item!
Not only the background, make sure your clothing items are in their best state too — Iron your clothes perfectly, place the collar and do up the buttons.
If you don’t want to use paper for the background you can use cardboard for an extremely smooth and flat shape.
Remember, your customers can’t try on your clothes virtually and they don’t know how the wearing will look like on themselves.
I’m trying to say that social media and online shop is not the same and the way of displaying products should be different on each platform.
Flat Lay suits social media because social users are not dedicated to buying your product. You can generate some leads through social media though.
Things to keep in mind in case of flat lay
But the visitors of your eCommerce are mostly looking for a product and you have to show them the perfect and right product that they are looking for.
Check out Shopify’s info-graphics on social commerce for being convinced.
For a partial conception of Flat lay, doing the following things may help:
- Use at least one of your products (you can use several too)
- Choose accessories or household item that compliments the product (For example a camera or a cup of tea, a sun glass or a hat can enhance the beauty)
The idea is to first drive visitors to your social media account and then to your eCommerce store.
The below photography is a good example of flat lay.
And It’s important to consider how your products are related to one another. Photos should clearly communicate the ongoing occasion, color, and attitude as to not overwhelm the viewer.
Step 2 – Prepare your clothing photography equipment
Wait, don’t get scared! The equipment you need doesn’t need to break the bank at all or isn’t expensive.
You can easily gather all the equipment you need within your starting budget. Digital cameras are constantly being down in price and smartphone cameras are being better and better.
And I’ll show you the complete list and will try to make you understand how to get the best quality equipment at affordable enough pricing.
Camera
The camera is the first thing that is a must for photography. Don’t think that the more qualified camera you buy the more you can get performance. The reality is you don’t have to choose a camera that you don’t need, no matter what the quality is.
And if you are too much rich and like to spend money I recommend you not to read this post and buy any million-dollar camera you prefer.
Mirror less is by far the best camera for shooting clothing items due to their newer technology. Studio lighting connectivity and physical lighter weight when you compare to traditional DSLR.
But don’t be fooled into buying one if you don’t need it. Your smartphone camera can just work well.
Lighting Equipment
For professional clothing photography, in all cases, lighting is necessary but only when you think you can’t use the sunlight (if you are not experienced).
Potential buyers want to see all the details of the item. That’s why choosing a lighting system that can talk with the camera is significant.
To begin with, I recommend selecting a lighting kit which contains three lights so that you can implement a three-point lighting setup such as one key light, one fill light, and a back or hair light.
If you finally decide to use a smartphone you should choose a regular light kit as there is no need to sync the light to your camera’s shutter. With this type of lighting kit, you can use a mirror less camera too but for better and desired results using a traditional studio lighting setup with a wireless trigger is best.
Studio Backdrop Kit
When you are done with lighting you need a studio Backdrop kit to help to take clear looking images.
I would recommend searching for a plain white photography backdrop with an inclusive stand. The piece should be approximate 10×20 foot as this lets you photograph mannequin at full length for any kind of garments and longer clothing items you may sell.
Studio (Wireless) Lighting Trigger
When I was discussing the mirrorless camera on the ‘lighting equipment ‘section I mentioned you would need a studio lighting trigger. This third-party tool communicates between the lights and kit.
It turns on or off the light when you click the button. The lighting density and other features can also be controlled with advanced level premium triggers.
When you purchase one of these triggers just make sure the brand of the trigger is compatible to work the brand of camera you are planning to use on.
Tripod
At first, selecting a sturdy tripod is a must for studio photography cause it can easily eliminate the unexpected camera shake caused by the hand holding the tripod. Aim to get a tripod that is rough and smooth. See well before you buy a tripod. It should be as high as reaching your eye and as firm as original.
Mannequin or Model
Mannequins add extra benefits and keep your budget low.
As I already mentioned before, make sure to get a mannequin without amputated arms or legs.
Hiring models is an expensive choice but while beneficial too. The added benefits that a professional can bring to the mannequin effect can sometimes outweigh the cost.
For instance, a model can change their body to complement your clothing items whereas if it were on a mannequin you would have to keep the style if you even don’t like that.
A model can also bring natural movement to the clothing by which a buyer finds comfort to buy. And Having a model pose in an outdoor state is better than your studio environment.
For example, lifestyle apparel images are growing in popularity and so it just depends on the overall look of your product image.
Photography toolbox
Having a bag full of generous tricks is always very handy when preparing your garment for a photo shoot.
Stuff like Cloth clips, pins, is often a needed thing and you can’t always run to your home for equipment.
To reflect a perfect, wrinkle-free photo by your photography necessary elements should always be gathered in a box or bag — it’s a reflection of the professionalism and smartness together.
Other useful items to have including tape to position your fabric, spare batteries for your camera, spare bulbs for studio lighting, and steam iron to rid any wrinkles.
Step 3 – Prepare your clothing products
Preparation is the core before going for photo shoot. I can’t tell you how many times I just messed things up finding a small thing.
The time we usually put in finding small objects should not be implemented further. Gather the elements at the right place after your photo shoot and take when you need but. Don’t be careless of the things you need — you could instead put that time in editing and sometimes save you from redoing an entire shoot!
I would advise gathering all the articles of clothing a little earlier and start a production line to get everything fully ready.
Let me tell you the process step by step to get your requirements ready:
- At first iron or steam all of the garments that you will photograph
- Make sure no wrinkles are showing on the garments
- Then have your photography toolbox open, check well, charge spare batteries and get the pins ready
- If you are going for mannequins, dress your mannequin with the first item of your product
Look out for these tiny details on your garments and other clothing products before going finally for photography:
- Check if the buttons are at the right place and buttoned up
- If your item has tassels or ties make sure they are styled neatly
- Make sure the sleeves are not only neat but consistent too
- Check if they are any stains in clothing and remove them
Step 4 – Set up your photography studio

When it comes to your photography studio you have to be very careful of the setup. It doesn’t matter if the studio is a professional one, located at a reputable place, or in just a spare area of the back of your store as long as you have proper lighting and a good camera.
Here’s a step by step process to set up your photography studio:
- Set up your backdrop first.
- After the backdrop, start setting up your lighting and camera.
- A three-point lighting setup is best for clothing photography.
To start with three-point lighting photography, setup one light next to your camera and direction it towards the mannequin or model — this is the key light.
The second light will act as a fill light and should be positioned at a 45-degree angle from the mannequin and further away from the first, key light.
And finally, position the remaining third light between the mannequin and backdrop.
Take a look at the below picture for a complete concept of three-point lighting, it’s an ideal example.
Step 5 – Check your camera settings
when you are in the middle of the “How to Take pictures of clothes to Sell Online” article, the thing you should prioritize the most is the camera
When it comes to setting your camera, three factors are should be checked before the shoot:
- Aperture.
- And shutter speed.
- ISO sensitivity.
Aperture
In the case of clothing photography, it’s ideal to shoot at a high f/stop, I mean between f/8 and f/11. This helps you get a more focused shot on your apparel products.
Shutter Speed
Shutter speed means how long your shutter would remain open. Ideally, you shout set it at 1/125 when doing photography for clothing.
ISO Sensitivity
Especially for clothing photography, the ideal ISO setting is between 400 and 800. But this actually depends on what type of light source you are using. If you use artificial lighting, set your ISO between 600 and 800 instead — it allows you to reduce the noise.
Step 6 – Start taking your product photos
Now we are onto your favorite part – starting to take the product photos.
Make sure that your camera is stable and standing perfectly. This will give you a crispy type and smother image. Unfortunately, if you don’t have a tripod you can place your camera on any stable or a little bit hard surface. Just make sure the camera doesn’t move.
The mannequin or model should be at the center of your camera frame. If you need a closer view you can either adjust your tripod or the optical zoom of the camera.
What not to do when doing clothing photography:
- Do not use digital zoom — it lowers the quality due to real-time cropping
- Make sure the mannequin or model is not far from the center
- Don’t do photography with a moving camera due to shake
- Make sure there’s not any kind of shadow around the target
Tips: set your camera on a timer mode of 2 seconds. This lets you refocus the subject after pressing the shutter.
Show off the details
Don’t overlook the tiny information when you photograph garments.
It’s worse for customers when they receive your product and feel that the fabric is stiff when they thought it was soft. Or that the item had a zip when they knew it was buttons. Or that the garment has zip when they knew it was buttons.
So, also, take clear photos of the stitching, fabric, tags, zips, and each small things that you think the customer may want to see this before ultimately making a purchase.
The best part of taking clear photos is you reduce the number of customer service questions by including every detail. Because now the customer has all the information about your product in front of them.
Enabling a zoom function would be a good choice so that the customer could take a closer look at their preferred areas and a few choice close-ups to show the customer where they should look may be beneficial too.
Tips when photographing clothing
I think you have now become quite good at Taking pictures of clothes to Sell Online
It is necessary to have the item sit correctly and for that I suggest using props and tools when you photograph clothing
- Iron the clothing items to remove any kind of fold or wrinkles. Using a Steamer would be the best option
- If you think filling out the bust would be better you can put a padded bra on your mannequin
- Use pins and pegs to clip garments into place if the item is too much large or big for your mannequin or model
- To give your product a natural movement you can use a fan
- Use transparent tapes to keep your tags and clips within the garment out of the way
Step 7 – Editing your product photos to increase sales online
Editing your photos is the next step after taking photos and it’s the final step too!
The time of thinking How to Take pictures of clothes to Sell Online is at the end and now you just have to upload the photos onto your eCommerce.
The more productively you can edit a photo the more greatly you can win the heart of your potential customers.
So, it’s time to edit your photos to make them look cool and consistent for your online store.
Your post-production process should be taken into consideration for getting a clear conception of how you exactly want your photos to look online.
Make sure that you can handle the alignment, cropping, white background, and color combination to ensure the consistency of your business.
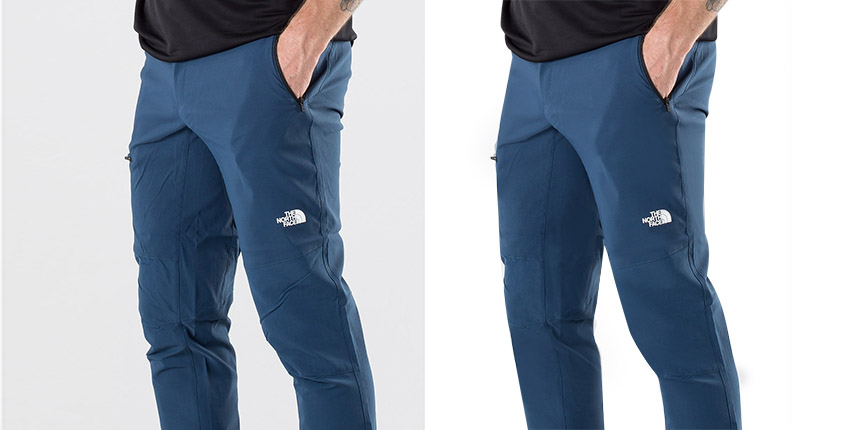
You may want to take your product photos to take to the next level. If yes, think about creating a ghost mannequin effect — you can’t get any more professional look than that.
A ghost mannequin effect makes your product look like it takes the form of a human body without a mannequin or model!
Sounds interesting! And fun meanwhile.
By showing off a small section of the inside of your garment you can make a three-dimensional look like the below image.
And the satisfying fact is you don’t need to hire a model for the ghost mannequin effect because a normal mannequin can do better!
How to create a ghost mannequin effect?
I am now telling you the complete process for the ghost mannequin effect here.
You need two photos for making the ghost mannequin effect. One from the front and the another from the back.
Firstly, take a shot of your product from the front and then take another from the back. but turn the product inside out.
You should use a tripod for this and always avoid changing the amount of zoom. A good idea is to also mark the spot of the mannequin on the floor. So it’s in the same photo for multiple related photos. This lets you make it easier to switch the items together afterward.

The next step is removing the background because you need to be able to see the back. Then all you have to do is place the front on top of the back on Photoshop — it isn’t much difficult if both your photos are taken from the same angle and distance.
I do understand that this requires a little bit of skill and extra time in Photoshop.
So, if you think you should hire someone who can do the job perfectly, ImagePixelator is available to assist you in any case.
Remove Wrinkles from your clothes
Removing wrinkles is a significant fact to consider. Without properly preparing your garment for photography you shouldn’t step forward.
As I mentioned earlier, steam is the best option for me.
First, place your garment on a flat surface, iron or steam accordingly, and remove the wrinkles, especially on the underarms.
Wrinkles make your garment look worse and in this way, customers could suspect your product before successfully making a purchase.
The last step – Upload your product photos to sell online
I know you are waiting for the last step – finally, upload your product photos online to sell and see how it works.
After your editing is finished. Review the photos again to perceive if the photos are still capable.
If yes, start uploading your items on your online store and marketplaces where you are selling on, making sure that your photos suit the image requirements.
Keep in mind that at the end of the day, quality is the best thing that customers want. Besides wonderful product photos, customers always expect to get the exact product they saw.
Conclusion
If you are careful enough with your clothing product photography you can do well in the photography journey.
I recommend working hard for achieving the key to photography.
We are a renowned company working for the past few years with dignity and plenty of satisfied clients.
If you think you need any service related to photography you can contact us. You can always expect that we will at least try to assist you further.